Adding a user
Watch the video tutorial:

How to add a user
- Click on the Admin menu icon and then click on Users.
- Click on the New button.
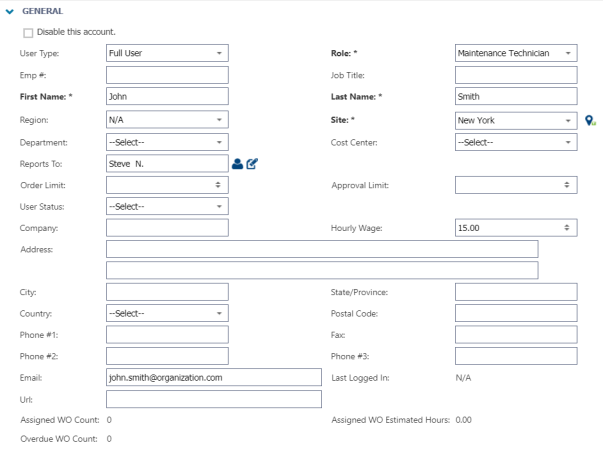
General
- Select the appropriate User Type for the user you are adding. There are 5 different User Types available to choose from:
- Administrator - Users that can be given access to everything in the account including Asset Essentials Enterprise Configurations. (User Role example: Global Administrator) *Note: Administrator users can only be added to Asset Essentials Enterprise accounts.
- Full User - Users that can be given access to everything in the account excluding Asset Essentials Enterprise Configurations. (User Role example: Account Administrator)
- Request Only - Users that only have access to create requests for work and view the requests for their assigned site(s). (User Role example: Requester and Power Requester)
- Specialty - Users that can enter maintenance requests, as well as view and edit PM work orders. (User Role example: Operator/TPM)
- Tracking Only - Users that do not have access to log into the system, but can have work assigned to them for tracking purposes. (User Role example: Contractors)
- Select the appropriate Role for this user. The list of user roles will be filtered to only show those that match the user type you selected.
- Select the appropriate Department for the user from the drop-down menu. *Note: Assigning a Department to a user may limit the work orders they see depending if Work Category Assignments are being implemented in your account.
- Enter any applicable information for the user you are adding, including First Name, Last Name, Site, Reports To, and Hourly Wage.
- Enter an email address or a mobile email address for the user in the Email field. *Note: If your organization is utilizing the Dude Universal Login platform, the only option is to enter one valid email address into this field.
Login/Custom settings
*Note: If your organization purchased Asset Essentials on July 17th, 2019 or later, your account will use the new Dude Universal Login platform. On the new platform, newly added users will receive an email to activate their account and create their own password. In addition, administrators will no longer have the ability to manage user passwords.
- Enter a Login name for this user.
- Enter a Password for the user. *Note: A valid password should be 6-20 characters in length and include each of the following: a capital letter, a lowercase letter, a number, and a special character.
- If you are entering generic passwords for all users, check the box next to The user must change password at next login, which will prompt them to create their own personal password.
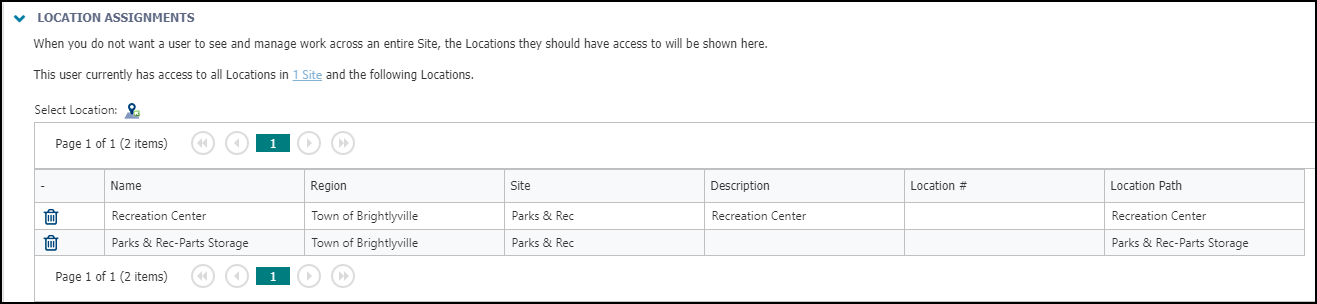
Location Assignments
Location Assignments will allow you to limit the work orders your Technicians can see in their work order list. When you assign a Technician to a location, they will only have access to view work orders at that location as well as work orders they have created and work orders that are directly assigned to them. *Note: This can only be completed after you click Save at the top of the page.
Bright Idea:
If the Technician has access to other sites, you have the ability to assign them locations for those sites as well. If they are not assigned to any locations for the other sites, then they will see work orders that they have created or are assigned to for all locations within those sites.
- Click on the Select Location icon (
).
- Select the appropriate Site from the drop down menu on the left-hand side of the window that appears.
- Check the box(es) next to the Location(s) in the Name column. *Note: You can only assign a user to a top level location.
- Click Select at the top of the window to add the Location Assignment.
Crew Assignment
Crews allow you to group users that typically work together on the same work requests.
- Click on the Crew picker icon (
).
- Check the box next to the appropriate Crew.
- Click Select.
- To adjust the Crew Index click on the arrow icon (
) to drag and drop the Crew to the appropriate location in the list. *Note: If a user is assigned to multiple Crews, you can designate a "primary crew". The user's "primary crew" is the first crew in the list and is the crew that will first display in the Crew column on the user summary page.
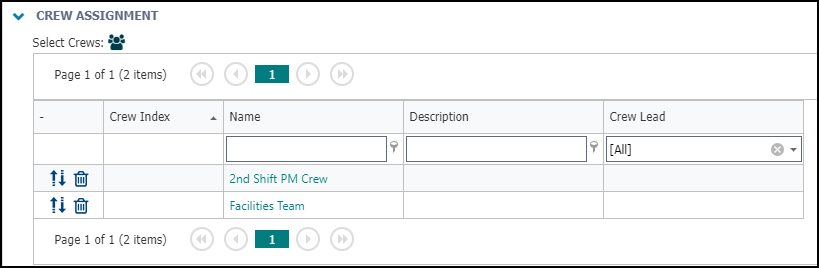
- Click on the name of the Crew to view it's details or click the trash can icon (
) to remove the user from the Crew.
Default views
Use this section to customize the default view of what this user will see on various pages in their account. For example, you can set the default view for Parts to either the "Parts Summary" or the "Parts to Reorder" view.
Work Shift
Use this section to select the Work Shift for this user. Work Shift is used on the Planner to determine the amount of available hours the user can work in a week. That amount will then be used to calculate the users daily utilization percentage. *Note: The Planner will not display the time range of the user's availability per day. That information can only be accessed here.
- Set the Work Shift for this user by checking the boxes for specific days of the week and entering the Start Times and End Times. *Note: Only Asset Essentials Enterprise clients have the ability to create preset Work Shifts that can be applied to a user.

Photo
Use this section to add a photo of the user.
- Click on the Select Document/Image icon to either select an image from the Documents Library, or add an image from your computer.
- Click Save at the top of this page to add the user and stay on this screen or click Save and Exit to add the user and return to the full list of users.
